
我们在开长途车的时候可能太累要打瞌睡,这是很危险的,很多高端车配备了瞌睡检测系统,那么是怎么实现的呢,今天小编带大家看看python怎么实现一个打瞌睡检测并报警的程序,先看看下面的效果图,
原理就是使用OpenCV检测视频流中的眨眼行为,并检测眼睛已经闭合了多长时间。如果眼睛已经闭合了超过了一定时间,系统便认为是打瞌睡并发出警报以唤醒他们并引起他们的注意。
▊ 在汽车上安装摄像头
我用于该项目的相机是Logitech C920。我喜欢这款相机,比较实惠。可以全1080p拍摄。即插即用几乎与我尝试过的所有设备(包括Raspberry Pi)兼容 。我拿了这台相机,并用一些双面胶带将其安装在仪表板的顶部,以防止在驱动过程中相机四处移动。然后将相机连接到我旁边座位上的MacBook Pro。
▊ 检测流程
▶首先,我们将设置一个相机来监视人脸流:

▶如果找到了脸部,我们将应用脸部界标检测并提取眼睛区域:

▶现在我们有了眼睛区域,我们可以计算眼睛的长宽比以确定眼睛是否闭合:
▶如果眼睛的纵横比表明眼睛已经闭合了足够长的时间,我们将发出警报以唤醒驾驶员:
▊ 具体实现代码
我们将使用OpenCV,dlib和Python来实现上面详述的打瞌睡检测算法。
使用OpenCV构建睡意检测器
我们新建一个新文件,命名为 detect_drowsiness。py ,并插入以下代码:
# import the necessary packages
from scipy.spatial import distance as dist
from imutils.video import VideoStream
from imutils import face_utils
from threading import Thread
import numpy as np
import playsound
import argparse
import imutils
import time
import dlib
import cv2
我们将需要SciPy 软件包,以便我们可以在计算眼睛长宽比时计算出面部界标点之间的欧几里得距离(并非严格要求,但是如果您打算在计算机视觉,图像处理中进行任何工作,则应该安装SciPy ,或机器学习空间)。
我们还需要imutils软件包,这是我的一系列计算机视觉和图像处理功能,以简化 OpenCV的使用。
如果您还没有安装imutils在系统上,则可以安装/升级imutils通过:
$ pip install --upgrade imutils
playound库可通过以下方式方便地安装:
$ pip install playsound但是,如果您使用的是macOS(就像我在该项目中所做的那样),则还需要安装pyobjc,否则将出错:
$ pip install pyobjc为了检测和定位面部标志,我们需要 在第11行中导入 的dlib库。如果您需要在系统上安装dlib。
def sound_alarm(path):
	# play an alarm sound
	playsound.playsound(path)
def eye_aspect_ratio(eye):
	# compute the euclidean distances between the two sets of
	# vertical eye landmarks (x, y)-coordinates
	A = dist.euclidean(eye[1], eye[5])
	B = dist.euclidean(eye[2], eye[4])
	# compute the euclidean distance between the horizontal
	# eye landmark (x, y)-coordinates
	C = dist.euclidean(eye[0], eye[3])
	# compute the eye aspect ratio
	ear = (A + B) / (2.0 * C)
	# return the eye aspect ratio
	return ear
睁开眼睛时,眼睛纵横比的返回值将近似恒定。然后,该值将在眨眼期间迅速降低至零。
如果眼睛闭合,则眼睛的长宽比将再次保持近似恒定,但将比睁开眼睛时的长宽比 小得多。

左上:当眼睛睁开时,眼睛界标的可视化。右上:闭上眼睛时的眼睛地标。底部:绘制随时间变化的眼睛纵横比。眼睛纵横比的下降表示眨眼(Soukupová和Čech的图1)。
在 左上角,我们的眼睛完全张开,并绘制了眼睛的面部轮廓。然后在 右上角,我们的眼睛闭上了。然后, 底部绘制随时间变化的眼睛纵横比。
如我们所见,眼睛的纵横比是恒定的(表示眼睛睁开),然后迅速下降到零,然后再次增加,表明眨眼了。
在睡意检测器的情况下,我们将监视眼睛的宽高比,以查看该值是否 下降但 没有再次增加,从而暗示该人已经闭上了眼睛。
接下来,让我们分析命令行参数:
# construct the argument parse and parse the arguments
ap = argparse.ArgumentParser()
ap.add_argument("-p", "--shape-predictor", required=True,
	help="path to facial landmark predictor")
ap.add_argument("-a", "--alarm", type=str, default="",
	help="path alarm .WAV file")
ap.add_argument("-w", "--webcam", type=int, default=0,
	help="index of webcam on system")
args = vars(ap.parse_args())
-shape-predictor 形状预测器 :这是dlib预先训练的面部标志检测器的路径。
- alarm 报警 :在这里,您可以选择指定要用作报警音频文件的路径。
-webcam 摄像头 :此整数控制内...
点击查看剩余70%


 {{collectdata}}
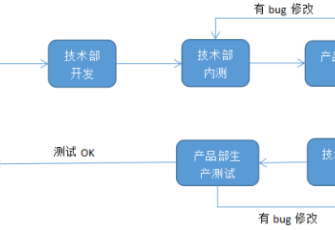


网友评论0